More about ELESOFTROM Company

ELESOFTROM Company is specializing in firmware development and fixing for embedded systems.

We have more than 10-years of experience in that area.

In developed tasks and projects we value reliability and effectivness of the firmware.

Fixing the Software for Emebedded Systems

Software for Microcontrollers


Home page

Full offer

Experience

About company

Contact


DioneOS - RTOS for embedded devices

ELESOFTROM developed RTOS for ARM Cortex-M3 and msp430.

The system is optimized for short execution time, having short switching time between threads.
The system provides elements (e.g. semaphores, mutexes, timers, queues etc.) used for building multi-threaded firmware.

Cortex version has full tests coverage and was tested by automatic testing framework.

Read more:

DioneOS home page

Reliability

Performance

DioneOS documentation

Tutorials about DioneOS


^ Blog index    << Broadcom VideoCoreIV 3D, Basics of Programming    >> QPU Programming

Broadcom VideoCoreIV 3D, IDE and Tools

2018-01-02   Piotr Romaniuk, Ph.D.

Contents

Mounted remote folder
Editors: Eclipse & Notepad++
Assembler and disassembler for VC4
Development and debugging QPU programs
Reference results
QPU example project
Links

Mounted remote folder

During development a software for embedded system and especially GPU programs, many things can go wrong, resulting board hung or filesystem crash. In such circumstances there is always a risk of a lost of source code. In order to avoid such a problem storage of the source code is recommended to be on some remote host (e.g. laptop). It is not very important what OS will be on that computer, it just should provide easy way to edit and browse source files, version control and ability to mount a folder to Raspberry-Pi.
If remote host has Linux use NFS filesystem, if it has Windows use shared folder and CIFS filesystem. Lets focus on Windows, because it is an example of cooperation of two different systems.
Establishing the connection requires following steps on Windows:

  1. create designated user for remote access (e.g. pi_user),
  2. create the folder that will be shared (e.g. shared),
  3. setup rights to that folder for new user (grant full control over the folder),
  4. enable and setup folder sharing (name the shared folder, e.g. shared-rpi),
  5. check IP address.

and on Raspberry-pi:

  1. create the folder where remote folder will be mounted (e.g. ~/vc4/shared-rpi),
  2. create a script if you wish to mount the folder manually (if you need automatic mount add proper line to fstab)
    for example mount-win.sh,
  3. add execution rights to the script
  4. add pi user to sudoers

Below is an example of the mounting script that mount remote windows folder that is on computer with the IP address 192.168.0.6. Folder is mounted in home folder of pi user with proper rights for this user.

#!/bin/bash

mount -t cifs -o rw,user=pi_user,uid=pi,gid=pi //192.168.0.6/shared-rpi /home/pi/vc4/shared-rpi

Figure 1. Script for mounting remote folder with sources.

In order to mount the folder execute the script and enter password of the windows user. Next, change directory to mount point and check if you see the contents of mounted folder and you can write there a file.

pi@raspberrypi:~ $ sudo ./mount-win.sh
Password for smb_access@//192.168.0.6/shared-rpi:  *********
pi@raspberrypi:~ $ cd vc4/shared-rpi
pi@raspberrypi:~/vc4/shared-rpi $ ls

   { here files should be listed that are on windows }

pi@raspberrypi:~/vc4/shared-rpi $ echo "123" > test.txt

   { now check on windows if test.txt file appeared in mounted folder and it has 123 contents }


Figure 2. Example of establishing the connection.

Editors: Eclipse and Notepad++
In order to easily work with sources two editors are recommended: Eclipse and Notepad++. The Eclipse was selected because it has good project and source management. It is used for C++ application development that will be started on Raspberry-Pi. The Eclipse will be used for source code development, i.e. editing the files, browsing definitions, function call hierarchi and many more usable features. The project should have a makefile, where build process is defined. Whole compilation will be performed on Raspberry-Pi, in SSH console (e.g. putty.exe can be used to establish such connection).
The second editor - Notepad++ is convenient for writing code for QPU cores. In Notepad++ it is possible to easily define custom syntax highlighting.
Download syntax highlighting for QPU assembler. - Click right mouse button that link and select save as, then Import this language definition in Notepad++ selecting menu Language|Define your language...|Import


Figure 3. Syntax highlighting in Notepad++ for QPU assembler.

Assembler and disassembler for VC4
Marcel Muller developed
macroassembler for VideoCoreIV-3D - great tool for programming VideoCore. There is also disassembler, so existing or generated code may be browsed, including fields of instructions. It is worth to read all pages on that site: that about instructions, expressions and especcially Addendum to Broadcom documentation - interesting specific aspects of QPU are discussed there.
Building the tools (i.e. vc4asm and vc4dis) is trivial, with one exception. Orignal build works fine, but there is an issue for mounted Windows7-x64 folder, as discussed here.

        pi@raspberrypi:~/vc4/qpu/shared-rpi/test1 $ make
        vc4asm -V -C hex/gpu_test1.cshader qasm/gpu_test1.qasm
        "qasm/gpu_test1.qasm" not found or no regular file.
        makefile:60: recipe for target 'hex/gpu_test1.cshader' failed
        make: *** [hex/gpu_test1.cshader] Error 1   
Figure 4. Assembling error due to QPU file in windows-x64 shared folder, for regular build vc4asm.

The problem is with stat() functions that checks if include files are available and are regular files. Stat() returns -1 and errno=75, that means overflow - see man of stat(). The compilation must be adapted to larger offsets. The solution of the problem is very simple, it is enough to add one define _FILE_OFFSET_BITS=64 for compilation tools source code:

1  FLAGS    = -Wall -std=c++11 -g#-O3
2  CPPFLAGS = -c -fPIC
3  #Added file-offset-bits=64 because otherwise stat() will not work with windows7-x64 mounted folders (cifs)
4  CPPFLAGS += -D_FILE_OFFSET_BITS=64 
5  LDFLAGS  =
...
Figure 5. Fixing makefile for vc4asm when working with windows7-x64 shared folder.

After you have built the tools, you need to add its bin directory to PATH variable in order to has it available.

Development and debugging QPU programs
Development and debugging programs for QPU cores seems to be difficult, because it is multicore, it is outside of host CPU, the access to core registers and internal VideoCore memory is not straightforward, there is no well known debugging. There must be something, but is not documented (there is mentioned BRPT interrupt in documentation).
Anyway, it is possible to manage it by proper methodology:

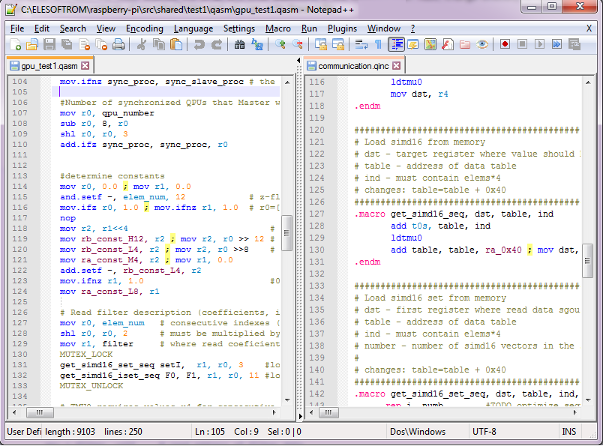
Minimal register dump may be implemented as a macro, hence it is easy to insert it in any location in the QPU program. If you need to examine the registers, this macro can be added in some line in the source code.


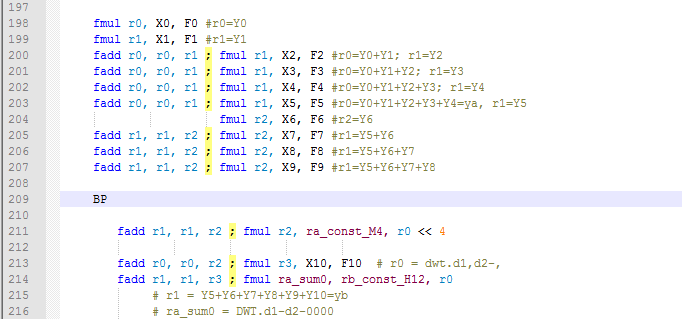
Figure 6. Example of breakpoint inserted in the source code.

When you look in macro implementation it can look like below.


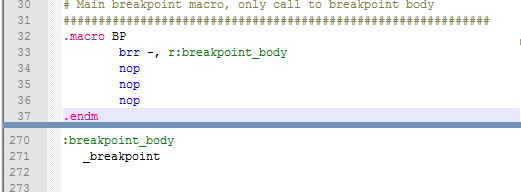
Figure 7. Breakpoint macro implementation.

The body of the macro uses two helping macros for dump of file registers (dump_regs) and writing data from VPM to SDRAM (store_dump). They perform also necessary waits in order to be synchronized with end of transfers. Full source code is avalable for download as a part of example of QPU programming project (see below) - file qasm/breakpoint.qinc.


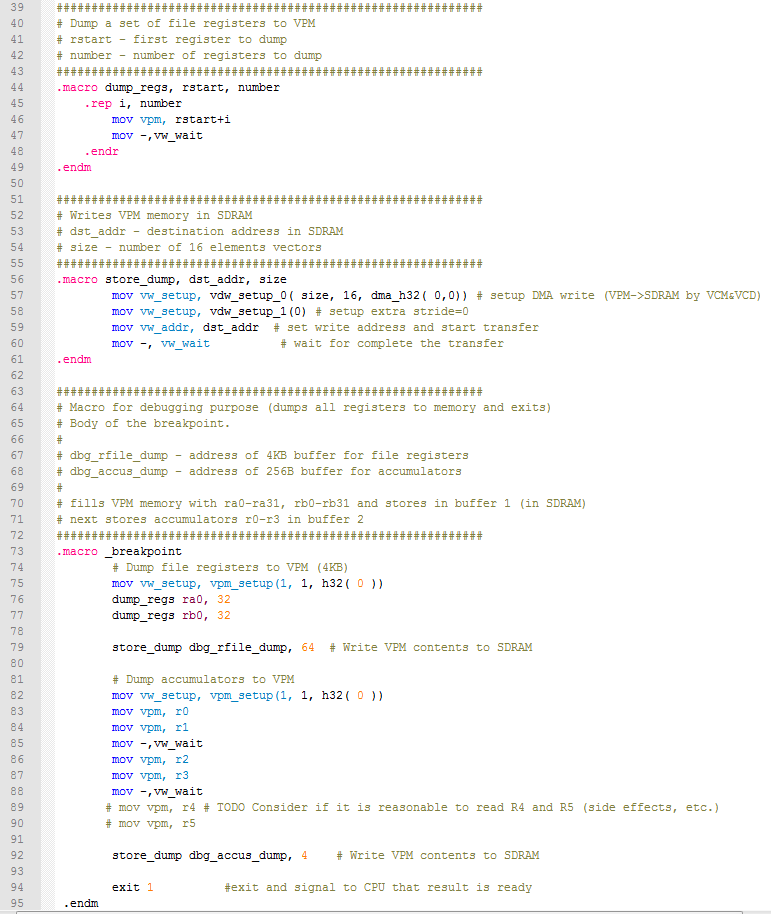
Figure 8. Breakpoint macro implementation (body).

The body of the macro (_breakpoint) writes all dumped registers (file registers and accumulators) to VPM (Vertex Pipe Memory) and stores it to the common memory with CPU. Addresses of buffers were passed via uniforms and stored in two file registers, with symbolic names: dbg_rfile_dump and dbg_accus_dump. After necessary writes that macro exits QPU program, so CPU program is released and prints the contents of the buffers in a readable form. An example of that log is presented below:


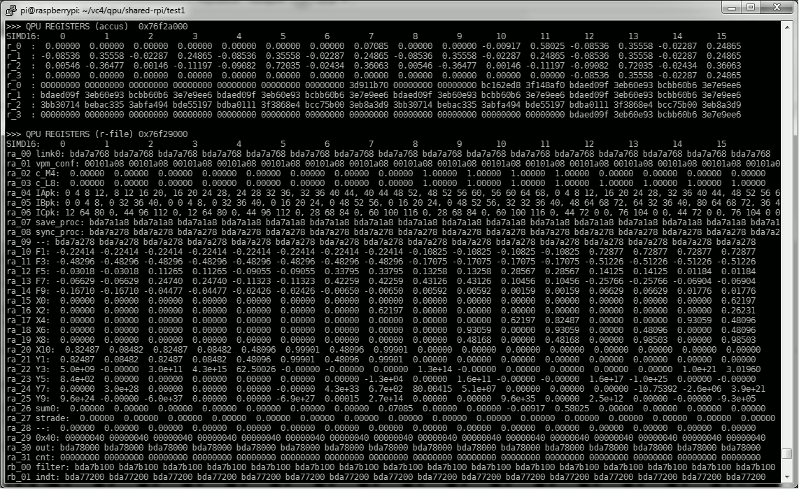
Figure 9. Example of QPU register dump - simple debugging technique.

NOTE
Above register dump is for one QPU core. It consists of 2 parts: accumulators and file registers contents (rb registers are only partialy visible in this figure). Each register is printed horizontally, with consecutive 16 elements from left to right. Accumulators are printed twice, as floating point numbers and hexadecimal 32-bit integer numbers. Special purpose accumulators r4 and r5 are omitted. For each file register symbolic name is assigned and format of the data is specified in application.


In this case, incremental aproach to programming means that you start from a program for single QPU and small part of data and incrementally scale up to multiple QPU cores and large data.
At the first phase you can develop the program in assembler, examine the QPU processor specific behavior. If it is your first program for the QPU, for sure you will see that some instructions work different that you thought. You will discover that some combinations of arguments are invalid, so the instructions are not so flexible one could expect. There are also some dependencies between consecutive instructions that you need to guard, otherwise result will be incorrect (e.g. written file register not available in next instruction).
This is also debug phase, when you correct the code. It will be not very difficult if you use registers dump. The code may be optimized here, especially by using dual-issue architecture of ALU.
In next phase add a loop, that processes next bunch of input data. Macro that dumps registers terminates the QPU program, so its not good for debug loop behavior. Nevertheless it is possible to workaroud that weakness. Copy the code in the loop, so you have the first and second loop iteration in different location. In that way you will be able to examine loop behavior (i.e. to check if loop variables are correctly changed from one iteration to another).
Now will be harder, you need to switch from one QPU program, to multiple QPUs. Start from the program for two QPUs, when it works extend it for more QPUs. Keep in mind that you need one program for all QPUs, there will be variations but the code should be one - QPU instruction cache memory has limited size!
Start from assigning different parts of data for each QPU. New item in this program will be a synchronization between cores. Learn how it is done in example.
Here results should be written into VPM and after all QPU cores finished, to common memory with CPU. In this way they will be available for verification.

Reference results
Even for one QPU debugging a program is more complex that for regular host processor (like ARM). The problem is a large set of data and its vector nature. To overcome this problem reference program is recommended. It can be written in C or C++ and should provide verification pattern: some input data and correct output for key stages of calculation. It is convenient to use textual form of that, so the result will be easily compared with one from QPU and put in registers dump. The comparison can be done in some spreadsheet (OpenOffice Calc, etc.), so vector form will be visible. Data can be transfered from log console to the spreadsheet via clipboard. Alternative way is to embedded the verification in the application.


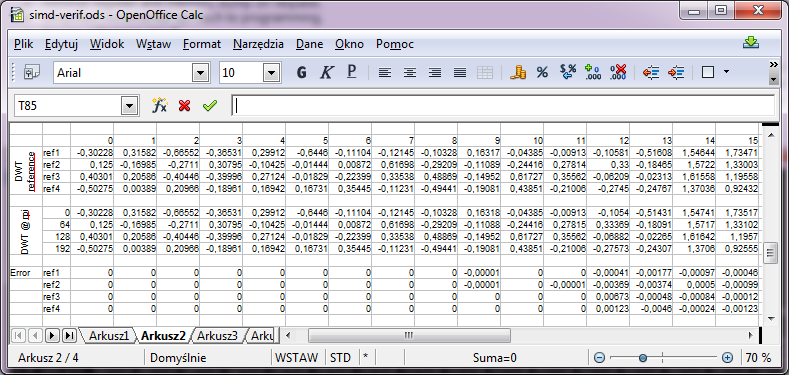
Figure 10. Example of SIMD16 verification in OpenOffice Calc.

QPU project example
Example of QPU programming can be dowloaded and used as basis for own experiments with QPU cores. It calculates Discrete Wavelet Transform using four QPU cores and SIMD16 parallel computing. This code contains methods described in this site, especially breakpoint macro can be useful for other programmers. See README.txt in this package for more details.
This software was developed on the basis of hello_fft, by some modifications and adaptation, QPU code was written from scratch but it uses some concepts from FFT example.
Please remember that this software is only a demonstration of the techniques and is provided "AS IS", without any warranty. The licence terms you may find in source files.
Download Eclipse project of Discrete Wavelet Transform on QPU cores (includes QPU source code).


Links

[1] Broadcom VideoCore IV 3D, Architecture Reference Guide - manufacturer's documentation of VideoCore
[2] Addendum to the Broadcom VideoCore IV documentation, Marcel Muller
[3] hello_fft QPU programming example https://github.com/raspberrypi/firmware/tree/master/opt/vc/src/hello_pi/hello_fft
    It is also located in preparred raspbian images in /opt/vc/src/hello_pi/hello_fft.